

Keeping users updated with the latest version of your Flutter app is critical for ensuring they have access to new features, bug fixes, and improved performance. While using a backend for version control is common, it’s not always necessary. In this post, we’ll walk you through implementing an automatic “New Version Available” popup in a Flutter app without needing a backend. Instead, we’ll rely on local app version comparison and publicly available app store data.
Table of Contents
Why You Don’t Need A Backend For Version Control?
Many apps rely on a backend to push version updates and changes. However, maintaining a backend can be time-consuming, especially for small-scale apps. Instead, you can utilize:
- Play Store and App Store APIs to fetch the latest app version.
- Local comparison methods to check the installed app version against the app store version.
By implementing the right logic, you can automate the entire version-checking process without setting up or maintaining a dedicated server.
Benefits Of Auto New Version Popup Without Backend:
- Cost-efficient: No server or backend is required, reducing development and maintenance costs.
- Quick Setup: Faster to implement since you bypass server setup and configuration.
- Self-contained Solution: Everything happens within the app itself, ensuring that all necessary operations are managed locally or with external services like the Play Store or App Store APIs.
Step-By-Step Guide To Implementing Auto New Version Popup Without Backend:
Step 1: Setting Up App Versioning In Flutter:
Flutter provides a straightforward way to set the version of your app through the pubspec.yaml file. The version follows a major.minor.patch structure, plus an optional build number.
Here’s how it looks in the pubspec.yaml file:
version: 1.0.0+1
- Version Name (1.0.0): This indicates the version visible to the user.
- Build Number (+1): This is used internally and can help track different iterations of the same version.
It’s important to increment these numbers each time you publish a new release.
Step 2: Adding Dependencies
To check for updates, we need to compare the current version of the app with the latest version available on the Play Store (for Android) or App Store (for iOS). We can use the following Flutter packages:
- package_info_plus: Retrieves app version information.
- url_launcher: Redirects users to the app store for updates.
- upgrader: A package that can handle version checks and show a customizable update popup automatically.
In the pubspec.yaml file, add the following dependencies:
dependencies:
  package_info_plus: ^1.0.0
  url_launcher: ^6.0.0
  upgrader: ^5.0.0
These packages will help fetch the app version, show the popup, and direct users to the appropriate app store.
Step 3: Checking The Current App Version
First, let’s write a function to get the current version of the app installed on the user’s device. This will use the package_info_plus plugin:
import 'package:package_info_plus/package_info_plus.dart';

Future<String> getCurrentVersion() async {
  PackageInfo packageInfo = await PackageInfo.fromPlatform();
  return packageInfo.version;
}
This function will return the current version of the app as defined in pubspec.yaml.
Step 4: Retrieving The Latest App Version From The App Store
To compare the current app version with the latest one available on the app store, we need to query the Play Store (for Android) or the App Store (for iOS). Fortunately, we can do this without any backend, using the upgrader package.
Here’s a basic example of how to retrieve the latest version:
import 'package:upgrader/upgrader.dart';

void checkForUpdates(BuildContext context) {
  AppcastConfiguration appcastConfig = AppcastConfiguration(
    url: 'https://example.com/appcast.xml',
    supportedOS: ['android', 'ios'],
  );

  UpgradeAlert(
    context: context,
    appcastConfig: appcastConfig,
    debugLogging: true,
    dialogStyle: UpgradeDialogStyle.cupertino,
  );
}
The upgrader package checks the app store for version updates automatically. You can configure it to suit your needs, including specifying the app store’s URL.
Step 5: Showing The Update Popup
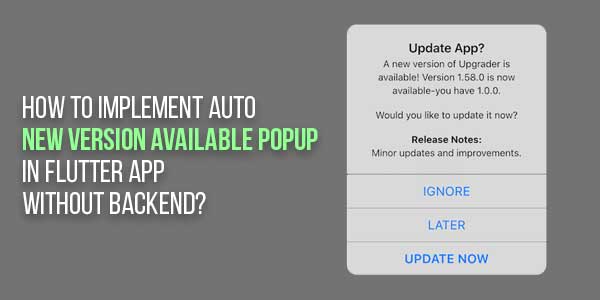
Once you’ve successfully checked for a new version, you can display a popup to inform the user that an update is available. The upgrader package handles this as well, allowing you to customize the popup.
Here’s how you can show a popup using upgrader:
void showUpdateDialog(BuildContext context) {
  UpgradeAlert(
    context: context,
    title: 'Update Available',
    message: 'A new version of the app is available. Please update to enjoy the latest features.',
    dialogStyle: UpgradeDialogStyle.material,
  );
}
The UpgradeAlert widget is easy to use and allows you to customize the title, message, and appearance of the update popup.
Step 6: Handling User Interaction
You want to give users a choice, whether to update the app immediately or later. The upgrader package automatically provides two buttons: “Update Now” and “Later”. You can further customize the user experience by:
- Allowing users to dismiss the popup.
- Redirecting users to the app store directly when they click “Update Now”.
void _launchStore(String url) async {
  if (await canLaunch(url)) {
    await launch(url);
  } else {
    throw 'Could not launch $url';
  }
}
Use the url_launcher package to open the app’s Play Store or App Store page for the update.
Step 7: Scheduling The Update Check
Now, you need to decide when to check for updates. A common approach is to check for updates every time the app starts, or when the user navigates to a key screen (like the home screen).
You can add the version-checking logic inside the initState() method of your main screen or any screen where you want the check to occur.
@override
void initState() {
  super.initState();
  WidgetsBinding.instance.addPostFrameCallback((_) {
    checkForUpdates(context);
  });
}
This will trigger the update check as soon as the widget is rendered, ensuring that the popup appears at the right time.
Step 8: Customizing The Popup
While the default popup provided by the upgrader package is functional, you may want to personalize it to better match your app’s design. You can modify the dialog’s style, text, and buttons.
Here’s an example of a customized popup:
void showCustomUpdateDialog(BuildContext context) {
  UpgradeAlert(
    context: context,
    title: 'Update Required!',
    message: 'We’ve released an important update. Please update the app to continue using it.',
    dialogStyle: UpgradeDialogStyle.material,
    canDismissDialog: false,
    showLater: false, // Remove the "Later" button
    showIgnore: false, // Remove the "Ignore" button
  );
}
In this case, the popup is styled with Material Design, and the “Later” and “Ignore” buttons are removed, making it a mandatory update.
Step 9: Testing The Update Popup
Before you deploy your app, it’s important to thoroughly test the update popup to ensure it behaves as expected. Here are a few things to test:
- Does the popup appear when there is a new version available?
- Is the user successfully redirected to the app store when they click “Update Now”?
- Does the popup behave well on different screen sizes?
- Does the update process work smoothly on both Android and iOS?
Step 10: Deploying The App
After testing, you can proceed to release your app to the app stores. Ensure that you increment the version in the pubspec.yaml file with each release so that the version-checking logic works as expected.
Remember to thoroughly test the version-checking and popup features on both Android and iOS before making the app live.
Best Practices For Implementing Auto Version Update Without Backend:
- Consistent Version Updates: Always update the version in your pubspec.yaml file when releasing a new build. The version number is what the app will use to compare with the app store’s latest version.
- Avoid Frequent Update Prompts: Trigger the version check only once per session or once a day to avoid annoying users with constant prompts.
- Graceful Failures: Handle cases where the app cannot fetch the latest version (e.g., the user is offline) gracefully.
- Use Public APIs: If necessary, consider using third-party APIs like the Google Play API to check for the latest version programmatically.
Conclusion:
Implementing an automatic “New Version Available” popup in your Flutter app is a straightforward process, and you don’t need a backend to achieve it. By leveraging packages like package_info_plus, url_launcher, and upgrader, you can easily monitor version updates, alert users, and prompt them to download the latest version from the app store.
By using this method, you save time, money, and effort while ensuring that your users always have access to the most up-to-date version of your app.


Be the first to write a comment.