Foreground application installation in windows will prefer the access of all the data where the user goes on searching online portals. While the user whats to select CPU priority which is useful in order to get into fore ground applications need to go with the notes that we are mentioning here. By going through the concentrated read over the page which illustrates the process of setting CPU priority to choose foreground applications to the users. The running applications which are get installed in the device will be assigned with fixed and limited period of time and the task of fixing the time will be the work behind the background stage. By having the presence of foreground application will be in very useful manner where as the customers will get supported with speed and limited time accessing over requested data.
This application will be capable of handling more over huge number of applications at a time without making the delay and disturbance over loading session. The requirement of less time period was specified by the appearance of these applications. So to consume the time, now a days, users are best to choose foreground applications into their computer devices. Where the user has the login of various web portals at a time the application will initially prefer the distribution of time over equal stages.
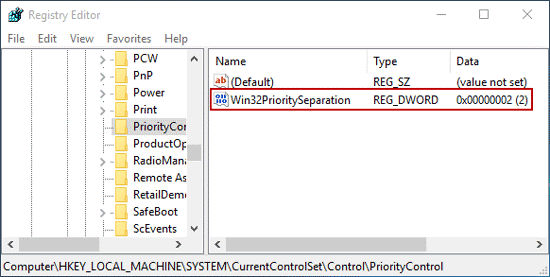
Are you interested to install foreground application in your computer accessing with windows 10? Then follow below steps and practically gone through them to have the appearance at front and functionality appearance at background. There are two different ways to select CPU priority in windows 10 such as Registry editor and control panel where as Control panel is more preferable and more selective way in windows version.
Steps to set CPU priority in to prefer foreground apps in windows 10:
Table of Contents
1.) Open Control Panel
Go with Control panel by quick access as a administrative account or choose short key as windows+x to open the session box of control panel.
2.) Navigation Of System And Security Levels.
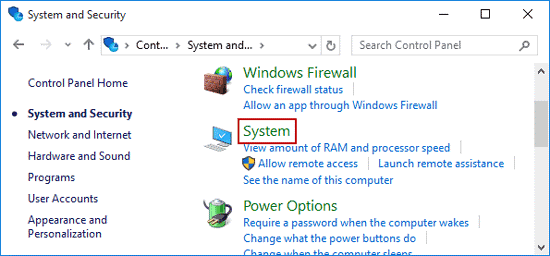
Click on system and security option from control panel main page and open it.
3.) Open System From System Security.
Go through system option which was present as sub option of system and security.
4.) Advanced System Settings
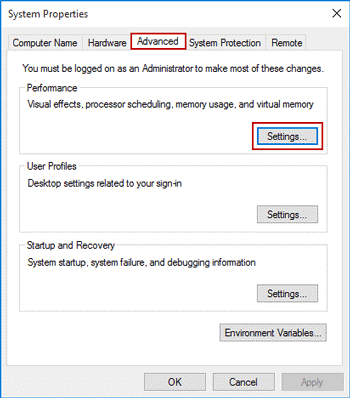
By going through inner appearance of system, select advanced system settings which was last option present at left side of the box. By going through this option, Windows edition will appear with official given logo which is an basic information for a computer device.
5.) System Properties:
In advanced settings of system properties, Choose the settings in advanced and go through them. Then make the settings as default and click on OK which is available at the bottom of the box appeared on the screen.
6.) Set Advanced Performance Of Programs:
Go through advanced options in performance and adjust the performance of best by choosing programs then save the settings by click on OK.
7.) Apply The Settings:
Now click on Apply then after click on OK to complete the task in successful manner. Generally the options are going to select optionally as default and make the optimization initially to select prefer applications in windows 10. Now CPU Priority with foreground application was selected in their respective devices and the session will start with changes happen in this process.


Thank you we got Good Information
Welcome here and thanks for reading our article and sharing your view.
Nice post, thank you for sharing information
Welcome here and thanks for reading our article and sharing your view. This will be very helpful to us to let us motivate to provide you with more awesome and valuable content from a different mind. Thanks again.