WordPress is a full featured platform for bloggers and also a open source so that you can add more features as per your desire. But if you are a newbie then WordPress also give you option to set your desired setting from their dashboard. Likewise other setting, Writing setting is also only for admin or owner of a WordPress blog so that all editing here will obly effective to you.
Use the Settings Writing Screen to control the interface you use when writing new posts. These settings control WordPress’s features in the adding and editing posts, Pages, and Post Types, as well as the optional functions like Remote Publishing, Post via e-mail, and Update Services.
Table of Contents
WordPress Writing Settings Options:
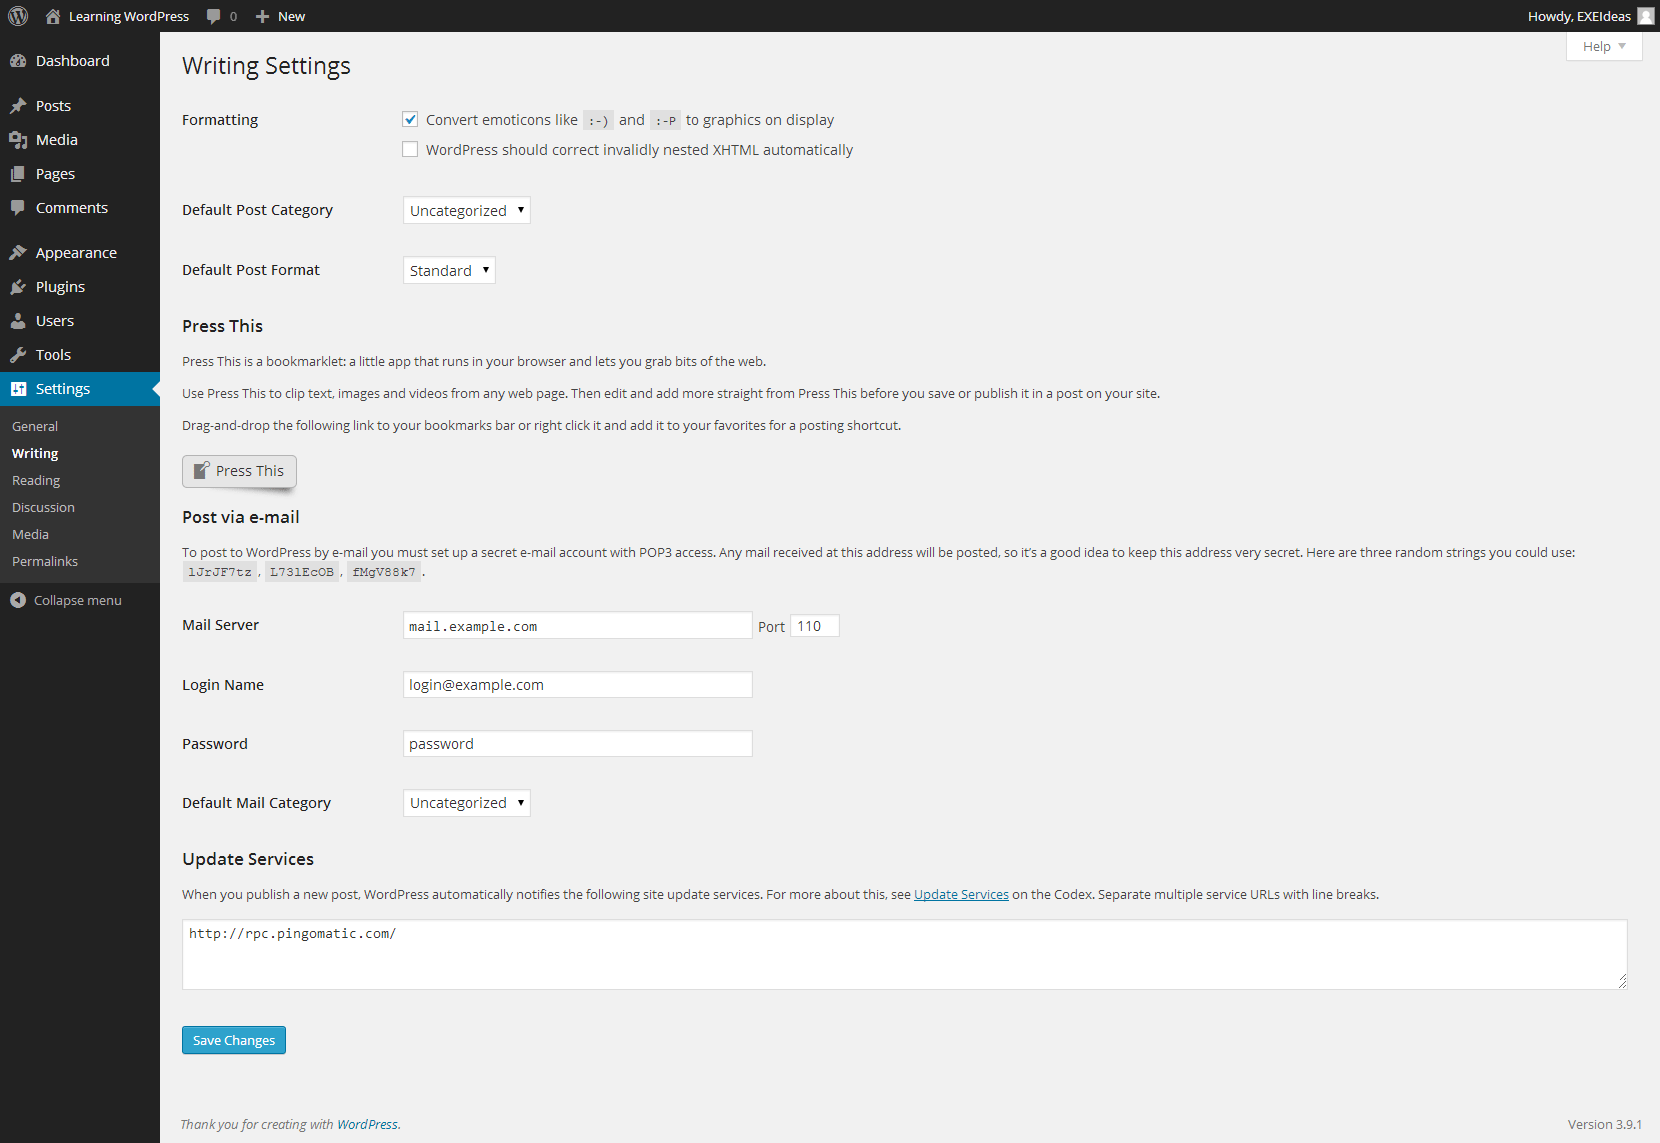
Here below we are explaining the upper screenshoot in short but if you want in detail then read the official documentation. This is of your WordPress Discussion Setting page. We Recommend to use upper screenshoot setting but you are allowed to use as you want.
Formatting:
- Convert emoticons like 🙂 and 😛 to graphics on display.
- WordPress should correct invalidly nested XHTML automatically.
Default Post Category:
Its is used when you write a post then WordPress automatically select the label from here for your post. This can be change for every post one by one from post editor.
Default Post Format:
You have to choose your post format from Standard, Aside, Chat, Gallery, Link, Image, Quote, Status, Video, Audio so that WordPress will automatically put your new post in this format. This can be change for every post one by one from post editor.
Press This:
Press This is a bookmarklet: a little app that runs in your browser and lets you grab bits of the web. Use Press This to clip text, images and videos from any web page. Then edit and add more straight from Press This before you save or publish it in a post on your site. Drag-and-drop the following link to your bookmarks bar or right click it and add it to your favourites for a posting shortcut.
Post via e-mail:
To post to WordPress by e-mail you must set up a secret e-mail account with POP3 access. Any mail received at this address will be posted, so it’s a good idea to keep this address very secret. Here are three random strings you could use: 5e4UHQiO, I0S1Ck6g, Mm5RriN1. (These will be change for every WordPress blog and keep it safe. Dont share.)
Mail Server:
Set your desired mail server and its Port with your server setting.
Login Name:
Keep in ind that if If the e-mail address that you will be using for the writing by e-mail feature is wordpress@example.com, then ‘wordpress’ is the Login name.
Password:
Enter the password for the above e-mail address here. Three possible passwords are displayed by WordPress in the introduction section of this Screen. (5e4UHQiO, I0S1Ck6g, Mm5RriN1)
Default Mail Category:
Its the same as “Default Post Category” but it will effect when you will post through email only.
Update Services:
If you have checked the box in “Reading Setting” at Search Engine Visibility: Discourage search engines from indexing this site then it will show you WordPress is not notifying any Update Services because of your site’s visibility settings. else When you publish a new post, WordPress automatically notifies the following site update services (Ping Sites). For more about this, see Update Services on the Codex. Separate multiple service URLs with line breaks.
Last Words:
This is what we have and shared in easy steps for newbies so that they can easily know how it works. Stay with us because we are going to share a whole guide step by step about WordPress and make it easy for you. If you liked it then share it and be with us to get next tutorial. If you have any problem then feel free to ask us. We will help you with what we can or have.


Be the first to write a comment.