Google Plus introduces embedded posts, Another long awaited feature of this social network finally comes to end. Like Twitter and Facebook Embed Posts, Google Plus also introduces this service. The question is Why too fast? The answer is simple that few weeks ago, Facebook launch this service through copying idea from Twitter and now Google Plus introduces this service after seeing it on world two top Social Networks.
The question is why to do this with our posts. The answer is that social media is the second most important way to get visitors and if we combine both then we can show something big. Through adding of post, we can increase +1 on our posts and we also can get comments on that from the same page. If we add it from our profile then there will be a “Follow” button and if we add it from out page then there will be a “Add To Circle” button that can help us to get circles and followers too. We can also pay some attention to our blog visitor that on GooglePlus, this huge amount +1 this post and comment on this so why not you.
Table of Contents
Embedded Posts Enable You To:
- Quote notable individuals or brands on Google+ inline in your article.
- Display Google+ posts in a Google+ branded frame identifying the source of the content.
- The post will update if the author of the post edits it.
- When your visitors encounter the Google+ embedded post on your site, they can +1, comment, or follow the post author, all without leaving your site.
Google Plus new feature which allows bloggers and webmasters to embed their publicly posted Google Plus posts into their blog posts.Like Twitter and Facebook embed post it will also be intractable with your blog audience and they can hashtags, share, +1, comment and even go to the original post. Google says that they always wanted to make it easy for bloggers to share content with their users and that is why they introduced this feature.
Supported Posts:
- In addition to posts that contain text and links, the following additional types of posts are supported as embedded posts:
- Posts with images – The post will render with the image. Clicking the image directs the visitor to the image view on Google+.
- Posts with videos – The post will render with the video. Clicking the video will play the video within the embedded post.
- Posts with links to a community – Your visitors can click through to view the community as they would in the stream.
- Currently, only public Google+ posts are embeddable on external websites.
UnSupported Posts:
- Posts from within a community
- Posts that are restricted to a Google Apps domain
- Private posts
- Events posts
- Hangout on Air posts
Official Links:
Google Support: support.google.com/plus/answer/3365138
Official Blog Post: googleplusplatform.blogspot.fi/2013/09/google-attribution-and-embedded-posts.html
For Developers: developers.google.com/+/web/embedded-post/
Features:
1.) Simple JavaScript Code.
2.) Awesome In Graphics And Style.
3.) Fully Controllable With Option.
4.) Lot Of Option To Do.
5.) Will Work On Cross Browser.
6.) Will Work On Profile And Page Only.
7.) 99.99% Updating Data From GooglePlus.
8.) +1, Comment, Follow, Add To Circle, Activity etc Button Added.
9.) Post Added Time With Share, Like, Comment Count Also Added.
10.) All Link Will New Open In New Tab.
11.) SEO Supported.
12.) Healthful For SMO.
13.) Can Increase Your Followers And Circles.
14.) Help You To Boost Your Post Freely.
15.) Frame/JavaScript Tag Coded.
16.) Profile Post Will Have Follow Button To The Poster.
17.) Page Post have “Add To Circle” Page Button To That Page.
18.) Full GooglePlus CSS3 Style Added.
19.) Latest Official Code By Google Inc.
20.) Quick To Load Without Interpreting Your Load Time.
Page Post Live DEMO
Profile Post Live DEMO
How To Embed A Post To Blog Or Website?
Its quite easy to embed the post There are two ways to embed. 1st is get your post code automaticall or 2nd is make your code manually. Automatic process is easy so first consider this.
1.) Open Your GooglePlus Account.
2.) Go To Page Or Profile.
3.) Move To That Post That You Want To Embed.
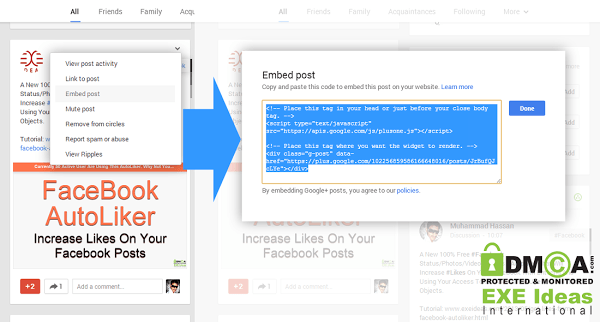
4.) While Viewing The Post In Google+, Move Your Cursor Over The Right Corner Of A Post To Reveal A Down Arrow.
5.) Click The Arrow To Expand The Post Options And Select “Embed post“.
6.) A Text Box Containing HTML/JS Code Will Appear.
7.) Copy The Code To Your Clipboard.
8.) Click “Done“.
9.) Paste The Code In The Location Of Your Blog/Site Where You’d Like To Display The Post That Is Mentioned Below.
10.) All Steps Are Shown In The Above ScreenShoot…
For Manually:
Copy The Below Code To Your Clipboard And Paste The Code In The Location Of Your Blog/Site Where You’d Like To Display The Post That Is Mentioned Below.
<!-- Place this tag in your head or just before your close body tag. -->
<script src="https://apis.google.com/js/plusone.js" type="text/javascript"></script>
<!-- Place this tag where you want the widget to render. -->
<div class="g-post" data-href="YOUR-GOOGLEPLUS-POST-URL">
</div>
How To Add In Blogspot?
1.) Go To Your www.blogger.com
2.) Open Your Desire Blog.
3.) Go To “Layout“.
4.) Click “Add A Gadget” Where You Want To Add It.
5.) Now Scroll To “HTML-JAVASCRIPT“
6.) Click “+” Icon To Add It.
7.) Now Copy The Below Code And Paste It To There.
8.) Leave The Title Empty Or Write Anything.
9.) Click “Save“, Now You Are Done.
OR
1.) Go To Your www.blogger.com
2.) Open Your Desire Blog.
3.) Go To “Template“.
4.) Click “Edit HTML“.
5.) Now Copy The Below Code And Paste It Between “<body> </body>“…
6.) Click “Save Template” And Done.
OR
1.) Go To Your www.blogger.com
2.) Open Your Desire Blog.
3.) Create A “New Post” Or “Edit” Some One Existing.
4.) Click “Edit HTML” Tab In The Post Editor.
5.) Now Copy The Below Code And Paste It There
8.) Click “Publish” Or “Update” To Done.
How To Add In Website?
1.) Just Go To Your HTML File.
2.) Now Copy The Below Code And Paste It Between “<body> </body>“.
3.) Save It, Now You Are Done.
Customization:
1.) Just Change “YOUR-GOOGLEPLUS-POST-URL” With Your Page/Profile Public Post URL Inm Manually Embed Option. You Can Get Your Post Code By Just Click The Time In Gray Color Under Your Profile Photo In Your GooglePlus Posts.
2.) Save And Done.
Last Words:
That’s all we know and you know that what we know, we just let you know too. 🙂 This method works smooth and great on both Blogger and WordPress. .If you have any more quires and question, then feel free to ask and don’t forget to fill our comment form too. Happy blogging and Best of luck 🙂


Be the first to write a comment.