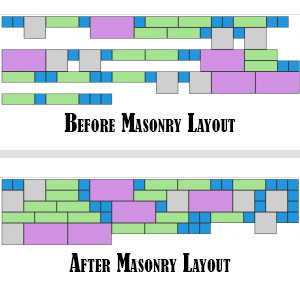
Masonry style layouts drive the boundaries regarding creative layout strategies. I personally adore how capable they end up being at maximizing your efficiency of galleries containing items having varying heights. Every bit of screen space is employed and the result can be downright mesmerizing. The modern web design world is an innovative one. Table-based lists with offset pagination are rapidly falling out of favor, whereas Masonry layouts with infinite scrolling are becoming the new norm.
Table of Contents
What Is Masonry?
Masonry is a JavaScript grid layout library. It works by placing elements in optimal position based on available vertical space, sort of like a mason fitting stones in a wall. You’ve probably seen it in use all over the Internet.
Now there are many one available only but not features are ok to use them because you have to watch out your loading time too so think twice before using the codes on your web that can make your loading time high of bad SEO effect. But this one is light weight and have to bunch of codes. All is here you you also do not have to hit any others URLs. Now go for it and garb the code to use it.
Features:
1.) Pure JavaScript Added.
2.) No External JavaScript Or JQuery File.
3.) No CSS Added.
4.) Simple And Fast Loading Code.
5.) Can Work With Any Browser.
How To Add In A WebPage?
1.) Just Go To Your “Web Page File”.
2.) Now “Copy” The Below Codes And “Paste” It To There Positions.
3.) “Save” It, Now You Are Done.
CSS:
<style type="text/css">
.wrapper {
width: 960px;
margin: 0 auto;
overflow: hidden;
padding: 0px 0px 10px 10px;
}
.wrapper .col {
float: left;
width: 25%;
}
.wrapper .col .item {
background: #ccc;
display: block;
margin: 10px 10px 0px 0px;
padding: 10px;
}
</style>
JavaScript:
<script type="text/javascript">
/*
Pure JavaScript MASONRY
Copyright (c) 2013 EXEIdeas International.
*/
//<![CDATA[
window.onload = MASONRY;
function MASONRY() {
var totalRows = 4,
itemCol = 0;
for(var rowCount = 0; rowCount < totalRows; rowCount++){
newCol = document.createElement('div');
newCol.className = 'col';
document.getElementsByClassName('wrapper')[0].appendChild(newCol);
}
for(var itemCount = 0; itemCount < document.getElementsByClassName('item').length; itemCount++){
document.getElementsByClassName('col')[itemCol].appendChild(document.getElementsByClassName('item')[0]);
if(itemCol < totalRows - 1){
itemCol++;
} else {
itemCol = 0;
}
}
}
//]]>
</script>
HTML:
<div class="wrapper">
<div class="item" style="height: 90px;">1</div>
<div class="item" style="height: 200px;">2</div>
<div class="item" style="height: 80px;">3</div>
<div class="item" style="height: 120px;">4</div>
<div class="item" style="height: 290px;">5</div>
<div class="item" style="height: 200px;">6</div>
<div class="item" style="height: 250px;">7</div>
<div class="item" style="height: 70px;">8</div>
<div class="item" style="height: 70px;">9</div>
<div class="item" style="height: 50px;">10</div>
<div class="item" style="height: 120px;">11</div>
<div class="item" style="height: 260px;">12</div>
</div>
Customization:
1.) Change your Blog URL and go for editing in JavaScript if you can or we are here to help you out. Rest is good to go..
Last Words:
That’s all we have. If you have any problem with this code in your blogger template then feel free to contact us with full explanation of your problem. We will reply you as time allow to us. Don’t forget to share this with your friends so they can also take benefit from it and leave your precious feedback in our comment form below. Happy blogging, See you in next article…


Be the first to write a comment.