
A sizable amount of the internet is powered by WordPress. One of its most notable powers is the use of plugins. Plugins give you the ability to provide certain extra features, enhance your site functionalities, or even apply targeted changes without editing the core WordPress files. This guide brings you up to speed on plugin development, walking you through creating your very first plugin from the ground up.
Table of Contents
What Is A WordPress Plugin?
A WordPress plugin is a small software that is added to a WordPress website to modify or introduce new features. Plugins may be a minor adjustment or a complete application, and they enable users to personalize their sites without having to change the actual WordPress code itself. Basic examples are SEO tools, contact forms, security plugins, and performance enhancers.
How Do Plugins Improve WordPress Functionality?
Plugins expand WordPress capabilities in several ways:
- Security Enhancements: Additional security layers like two-factor authentication and firewalls.
- Performance Enhancements: Caching, image compression, and database management for improved loading speeds.
- Custom Functionality: Contact forms, social media integration, and e-commerce support.
- User Experience Adjustments: Layout adjustments, admin setting refinements, and navigation enhancements.

Setting Up For Plugin Development:
Before writing your first line of code, you’ll need a proper setup. Here’s everything you need to get started:
1.) Choose A Local Development Environment:
A local development environment allows you to build and test your plugin without making changes to a live website. This setup simulates a web server on your computer, helping you work efficiently. Here are some popular tools:
- XAMPP (Windows, macOS, Linux): A free and easy-to-use environment that includes Apache, MySQL, PHP, and Perl.
- WAMP (Windows only): Similar to XAMPP but designed specifically for Windows users.
- MAMP (macOS, Windows): A user-friendly alternative for Mac users.
- Local by Flywheel: A beginner-friendly option with an intuitive interface, allowing quick WordPress site setup.
Once you install one of these, you can create a local WordPress site and use it as a testing ground for your plugin.
2.) Install WordPress Locally:
To install WordPress locally:
- Download the latest version of WordPress from wordpress.org.
- Extract the files and place them in the appropriate directory (e.g., htdocs for XAMPP or www for WAMP).
- Create a database using phpMyAdmin and connect it during the WordPress installation process.
- Log in to your new local WordPress site, where you’ll test your plugin.
3.) Choose A Code Editor:
You’ll need a text editor to write and edit your plugin code. While you can use a simple editor like Notepad++, dedicated code editors provide better features like syntax highlighting, debugging tools, and autocomplete. Some popular choices include:
- Visual Studio Code (VS Code): Free, lightweight, and packed with extensions.
- Sublime Text: Fast and minimalistic with powerful features.
- PHPStorm: A premium IDE with built-in WordPress support.
These editors help speed up coding, making plugin development smoother.
4.) Understand The Basic Languages Used In WordPress Plugins:
To build a WordPress plugin, You require a minimum knowledge of:
- PHP: The core language of WordPress, used for backend logic.
- HTML & CSS: For structuring and styling any user-facing elements.
- JavaScript & jQuery: Useful for dynamic and interactive features.
- WordPress Hooks (Actions & Filters): These allow your plugin to interact with WordPress without modifying core files.
If you’re new to coding, start with PHP and gradually learn how it interacts with WordPress functions.
5.) Set Up A Debugging System:
Debugging helps identify and fix issues during development. WordPress has built-in debugging tools:
Enable Debug Mode:
- In your wp-config.php file, add the following lines:

This ensures that errors are logged in the debug.log file inside wp-content, allowing you to review them later.
Use Debugging Plugins:
- Query Monitor: Helps analyze database queries, hooks, and PHP errors.
- Debug Bar: Displays useful debugging information in the admin bar.
6.) Set Up Version Control (Optional But Recommended):
If you’re working on a serious project, using Git for version control is a great idea. It allows you to monitor changes, roll back to a past version, and work with other people. Platforms like GitHub, GitLab, or Bitbucket help manage your plugin code efficiently.
7.) Create A Sandbox Testing Site (Optional But Useful):
While a local setup is great, testing on a staging or sandbox site provides real-world conditions. You can:
- Use a subdomain or separate WordPress installation for testing.
- Use services like WP Sandbox or WP Staging for easy testing.
Step-By-Step Guide To Building Your First Plugin:
Inside the folder, create a PHP file with the same name as your plugin, e.g., my-first-plugin.php. Add this header at the top:
Step 1: Create A Plugin Folder
Go to the wp-content/plugins/ directory in your WordPress installation and create a new folder for your plugin. Give it a unique name, such as my-first-plugin.
Step 2: Create The Main Plugin File
Inside the folder, create a PHP file with the same name as your plugin, e.g., my-first-plugin.php. Add this header at the top:
Step 3: Add Basic Functionality
Let’s make a simple function that displays a custom message in the WordPress admin dashboard: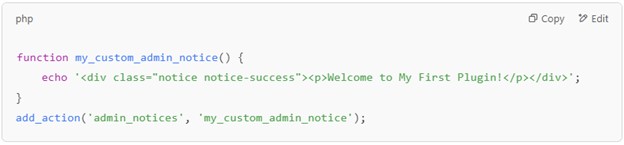
Step 4: Activate Your Plugin
Head to the WordPress dashboard, go to Plugins, find your plugin, and click Activate. If done correctly, you should see your custom message in the admin panel.
Best Practices For WordPress Plugin Development:
To develop stable and secure plugins, use the following guidelines:
- Use Unique Naming Conventions: Prefix function names and variables to avoid conflicts.
- Follow WordPress Coding Standards: Adhere to PHP, HTML, and CSS best practices.
- Keep It Secure: Sanitize inputs, validate data and use nonces for form security.
- Ensure Good Performance: Optimize database queries and use caching wherever possible.
- Maintain Compatibility: Test your plugin with various WordPress versions and themes.
Conclusion:
At first glance, creating a WordPress plugin might seem somewhat of a complicated task, but this is an incredibly thrilling trip when done with the right tools and approach. Plugins offer you an opportunity to customize WordPress the way you see fit, adding tiny features or building robust solutions. If you are serious about your development, it is a good idea to partner with a software development company to refine your ideas and make sure your plugin is up to industry standards. Having that on your resume, now it’s time to get coding and create your plugin!
 About the Author:
Pranjal Mehta is the Managing Director of Zealous System, a leading software solutions provider. Having 10+ years of experience and clientele across the globe, he is always curious to stay ahead in the market by inculcating the latest technologies and trends in Zealous.


Be the first to write a comment.